简介 JMX(Java Management Extensions)从management来看,这是一个管理的框架。用jmx可以监控和管理应用程序。下面就对jmx进行简单的介绍
整体架构 JMX的整体架构分为三层。设备层(Instrumentation Level)、代理层(Agent Level)、分发层(Distributed Level)。额,如果感觉有点懵,没关系,暂时理解自上而下分为三个层次就可以。
结构图如下:
设备层
什么是”设备层”?定义信息模型
什么事”设备”?简单来说就是能被java描述出来的一个对象,这些对象成为“管理构件”,简称MBean
这些MBean就是我们要管理的指标,每个MBean都可以监控一类信息
MBean又分为以下几种:
Standard MBean
Dynamic MBean
Open MBean
Model MBean
MXBean
这里以Standard MBean、Dynamic MBean、MXBean为例作为入门介绍
Standard MBean 这是最简单的MBean,通过方法名来管理接口。Standard MBean的实现依赖于一组特定的命名规范。
规范如下:
定义一个接口,名称为xxxxMBean的格式,必须以MBean结尾,以User为例,接口名为UserMBean
定义属性方法,假设User含有id和name属性,那么可以通过定义getId、setId、getName和setName来控制属性是否可读写,如果只定义了set方法,那么该属性可写不可读;如果只定义了get方法,那么该属性可读不可写;同时定义,那么就可读可写
定义操作,其他非get和set方法,可以算是对该对象的操作
接口定义完了,具体实现,需要继承上接口,以UserMBean为例,那么该实现也就必须命名为User,然后实现该接口
补充一点,参数和返回类型只能是简单的引用类型(如String)和基本数据类型,其他类型编译不会出错,但是结果会稍有不同,稍后验证
Dynamic MBean 这种MBean就没有那么多限制,但是有一条硬性规则,必须实现javax.management.DynamicMBean接口。所有的属性都在运行时定义的。比较灵活
MXBean 严格上讲,MXBean这不是MBean的一种分类。MXBean是MBean的一种,只是这货有些特殊,较为常用,所以放在一起讲。
规范如下:
实现xxxMXBean接口,或者不按照MXBean结尾来命名,但是需要加上@MXBean的注解
支持各种数据类型,包括自定义类型
其他方法命名规则与MBean类似
代理层 代理层就是用来管理资源的,管理MBean。代理层的核心模块就是MBean Server和一系列附加的MBean Service。
分发层 这一层主要是根据不同的协议定义了对代理层进行各种操作的管理接口
简单的Demo1 1 2 3 4 5 6 7 8 9 10 11 12 13 14 15 16 public interface UserMBean public void setId (Integer id) public Integer getId () public void setName (String name) public String getName () public void setBirthDate (Date date) public Date getBirthDate () public void setTime (LocalTime time) public LocalTime getTime () public void printUserInfo () public Date currentDate () public void setTest (Test test) public Test getTest () }
新建一个标准MBean的接口,定义好属性和操作
根据前面介绍的规则UserMBean有Id、Name、BirthDate、Time和Test属性,而且都是可读可写
1 2 3 4 5 6 7 8 9 10 11 12 13 14 15 16 17 18 19 20 21 22 23 24 25 26 27 28 29 30 31 32 33 34 35 36 37 38 39 40 41 42 43 44 45 46 47 48 49 50 51 52 53 54 55 56 57 58 59 60 61 62 63 64 65 66 67 68 69 70 71 72 73 74 75 76 77 78 79 80 81 82 83 84 85 86 87 88 public class User extends NotificationBroadcasterSupport implements UserMBean private int id; private String name; private String password; private Date birthDate; private LocalTime time; private Test test; private long sequenceNumber = 1 ; @Override public void setId (Integer id) this .id = id; } @Override public Integer getId () return this .id; } @Override public synchronized void setName (String name) Notification n = new AttributeChangeNotification(this , sequenceNumber++, System.currentTimeMillis(), "name changed" , "name" , "String" , this .name, name); this .name = name; sendNotification(n); } @Override public String getName () return this .name; } @Override public void setBirthDate (Date date) this .birthDate = date; } @Override public Date getBirthDate () return this .birthDate; } @Override public void setTime (LocalTime time) this .time = time; } @Override public LocalTime getTime () return this .time; } @Override public void printUserInfo () System.out.printf("User: { id=%s, name=%s }\r\n" , this .id, this .name); } @Override public Date currentDate () return new Date(); } @Override public void setTest (Test test) this .test = test; } @Override public Test getTest () return this .test; } @Override public MBeanNotificationInfo[] getNotificationInfo() { String[] types = new String[] { AttributeChangeNotification.ATTRIBUTE_CHANGE }; String name = AttributeChangeNotification.class.getName(); String description = "An attribute of this MBean has changed" ; MBeanNotificationInfo info = new MBeanNotificationInfo(types, name, description); return new MBeanNotificationInfo[] { info }; } }
1 2 3 4 5 6 7 8 9 10 11 12 13 14 15 16 17 18 19 20 public class Test private String name; private int age; public String getName () return name; } public void setName (String name) this .name = name; } public int getAge () return age; } public void setAge (int age) this .age = age; } }
先忽略NotificationBroadcasterSupport
实现了UserMBean接口。而且命名为User,符合规范
这样一个简单的设备层的对象就已经建好
Test只是作为一个简单验证
1 2 3 4 5 6 7 8 9 10 11 12 13 14 15 16 17 18 19 20 21 22 23 24 25 26 27 28 29 30 31 32 33 34 35 36 37 38 39 40 41 42 43 44 45 public class UserAgent implements NotificationListener private MBeanServer mBeanServer; private MBeanServer mBeanServer1; public UserAgent () mBeanServer = ManagementFactory.getPlatformMBeanServer(); mBeanServer1 = MBeanServerFactory.createMBeanServer("Hello" ); try { ObjectName name = new ObjectName("UserAgent:type=User1" ); User user = new User(); user.setName("test" ); user.setId(1 ); user.setBirthDate(new Date()); user.setTime(LocalTime.now()); Test test = new Test(); test.setName("mytest" ); test.setAge(11 ); user.setTest(test); mBeanServer.registerMBean(user, name); mBeanServer1.registerMBean(user, new ObjectName("Hello:type=user" )); Thread.sleep(Long.MAX_VALUE); } catch (MalformedObjectNameException e) { e.printStackTrace(); } catch (NotCompliantMBeanException e) { e.printStackTrace(); } catch (InstanceAlreadyExistsException e) { e.printStackTrace(); } catch (MBeanRegistrationException e) { e.printStackTrace(); } catch (InterruptedException e) { e.printStackTrace(); } } @Override public void handleNotification (Notification notification, Object handback) } }
新建了一个代理类,先忽略NotificationListener,这个可以不用实现
该代理类里面声明了两个MBeanServer,只是实例化的方式不同,方便后面做验证
ObjectName是为了给代理对象命名
紧接着就是实例化User并赋值
通过MBeanServer的registerMBean将user注册到MBeanServer中
1 2 3 4 5 public class Main public static void main (String[] args) throws Exception UserAgent userAgent = new UserAgent(); } }
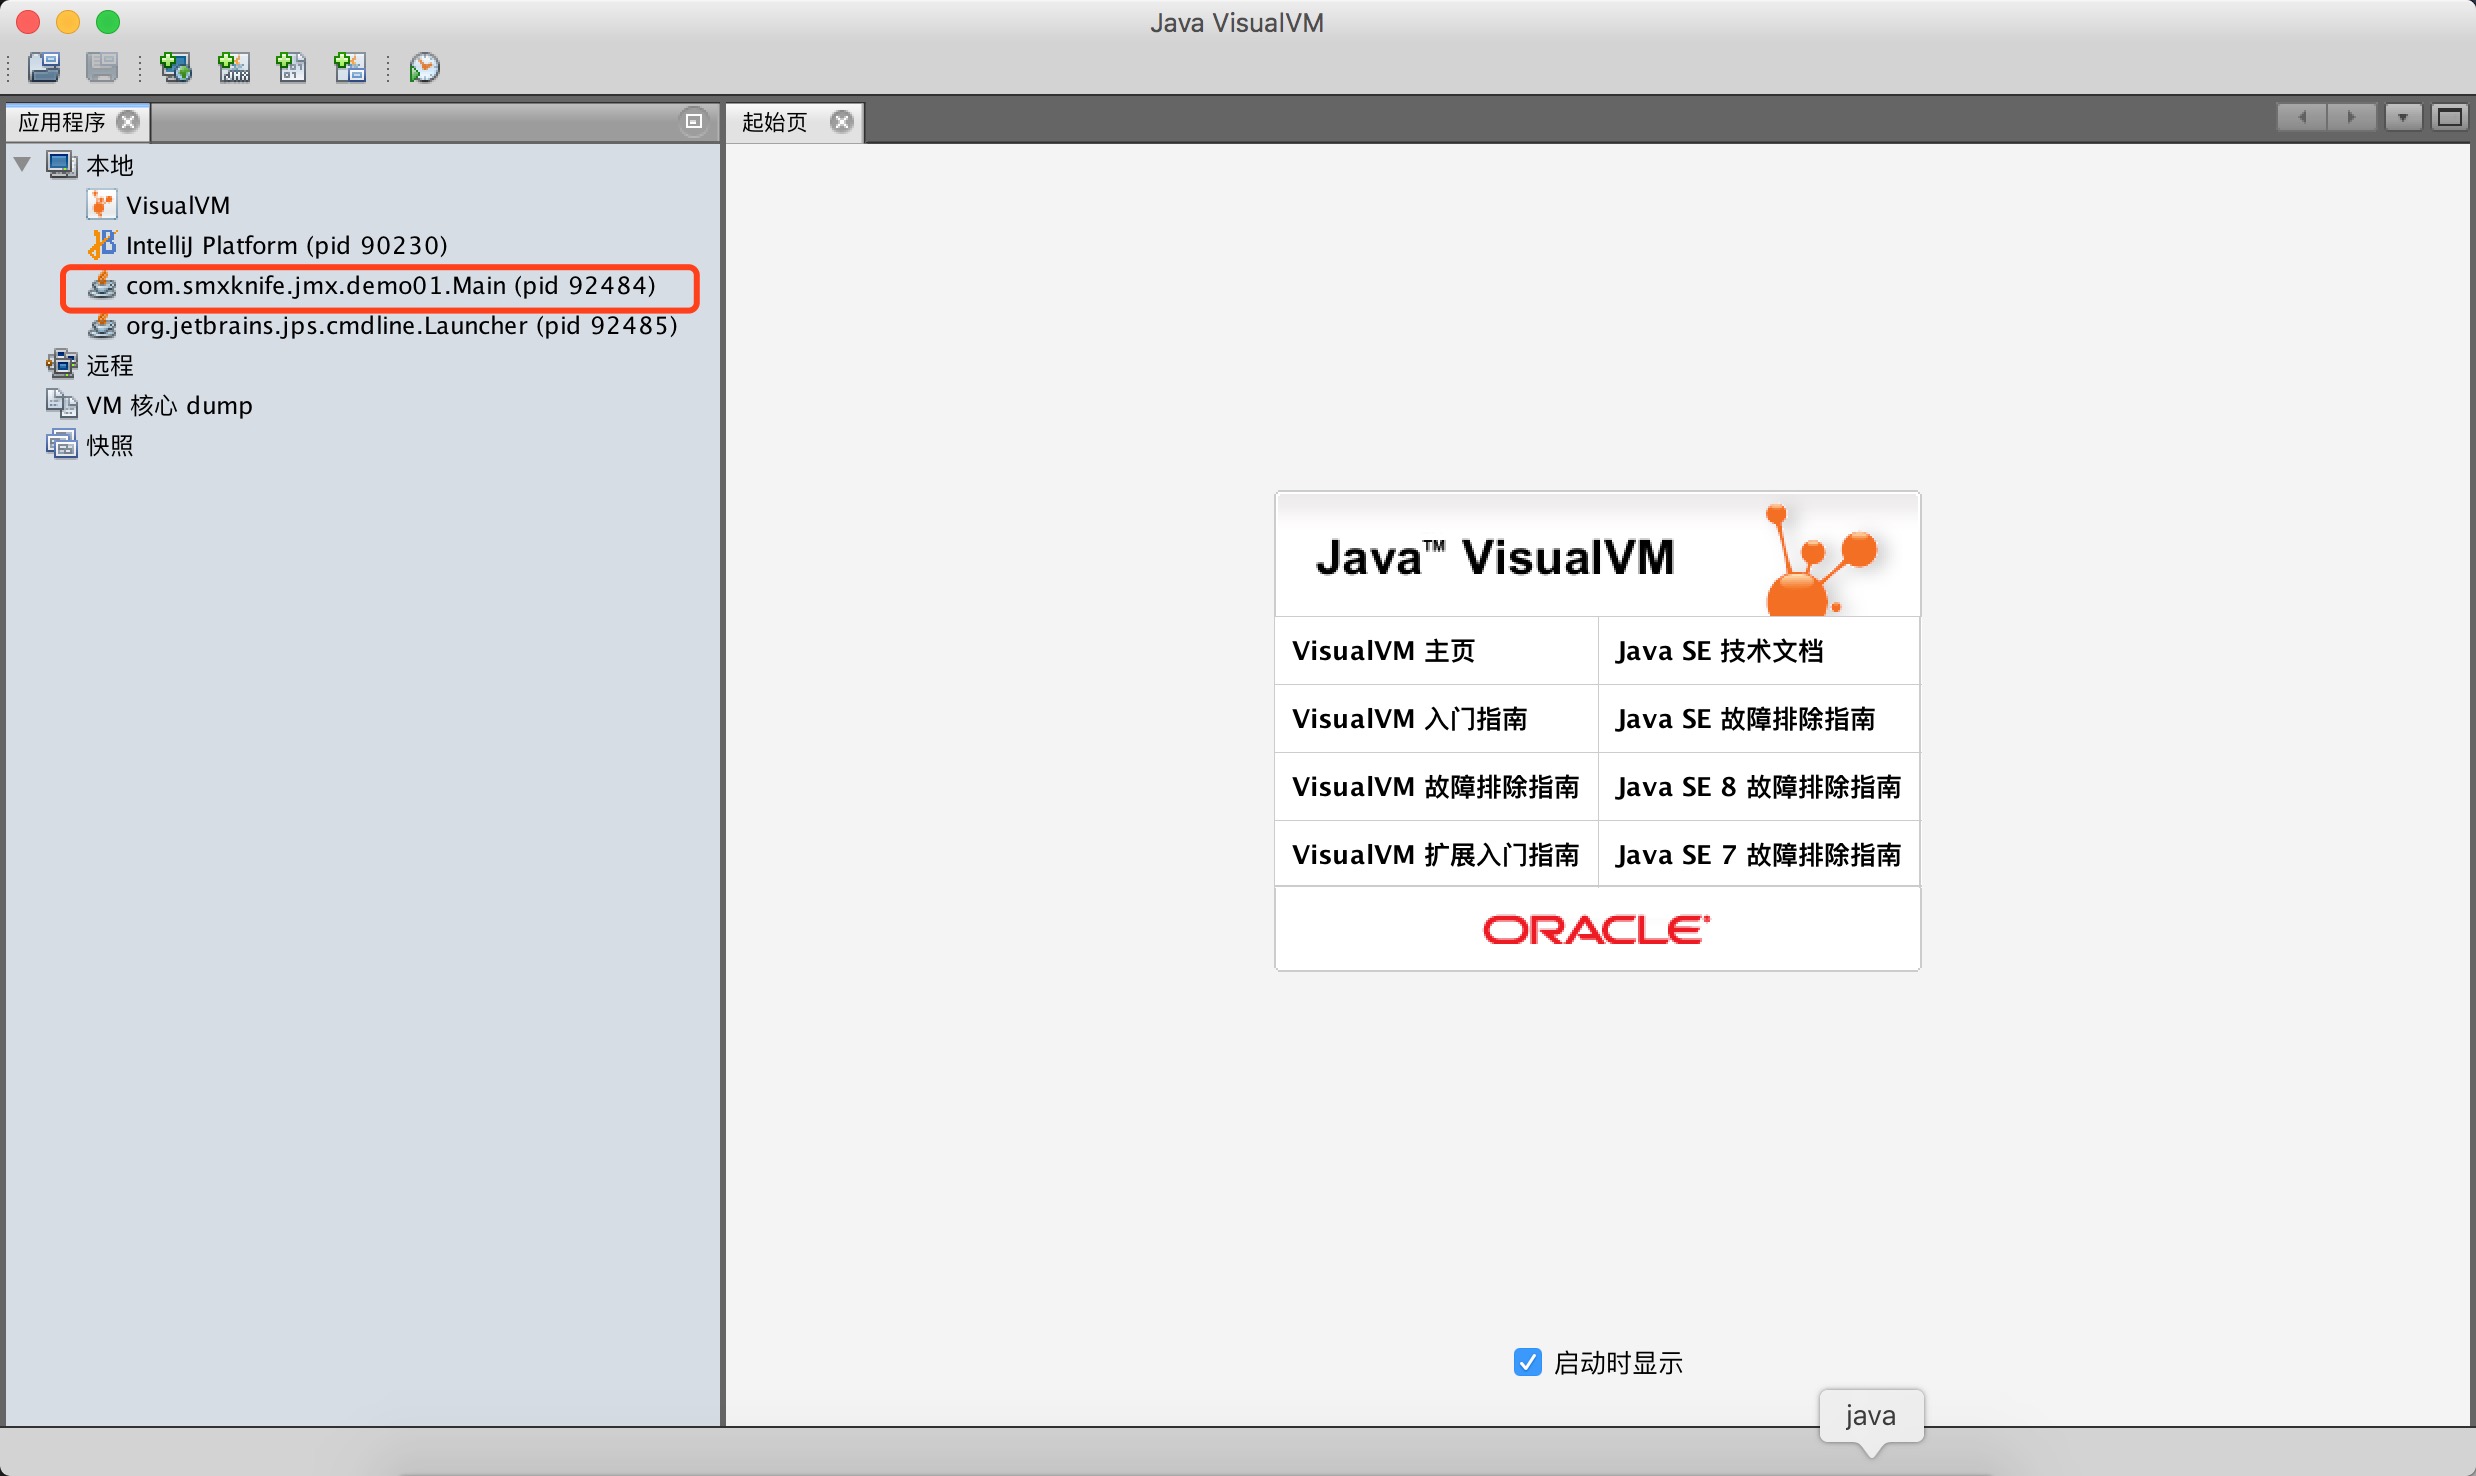
通过jdk提供的两款工具都可以连接进行查看,分别是jconsole和jvisualvm,这两个都在jdk的bin目录下,很容易找到。下面我以jvisualvm为例来看一下
找到自己的项目,双击
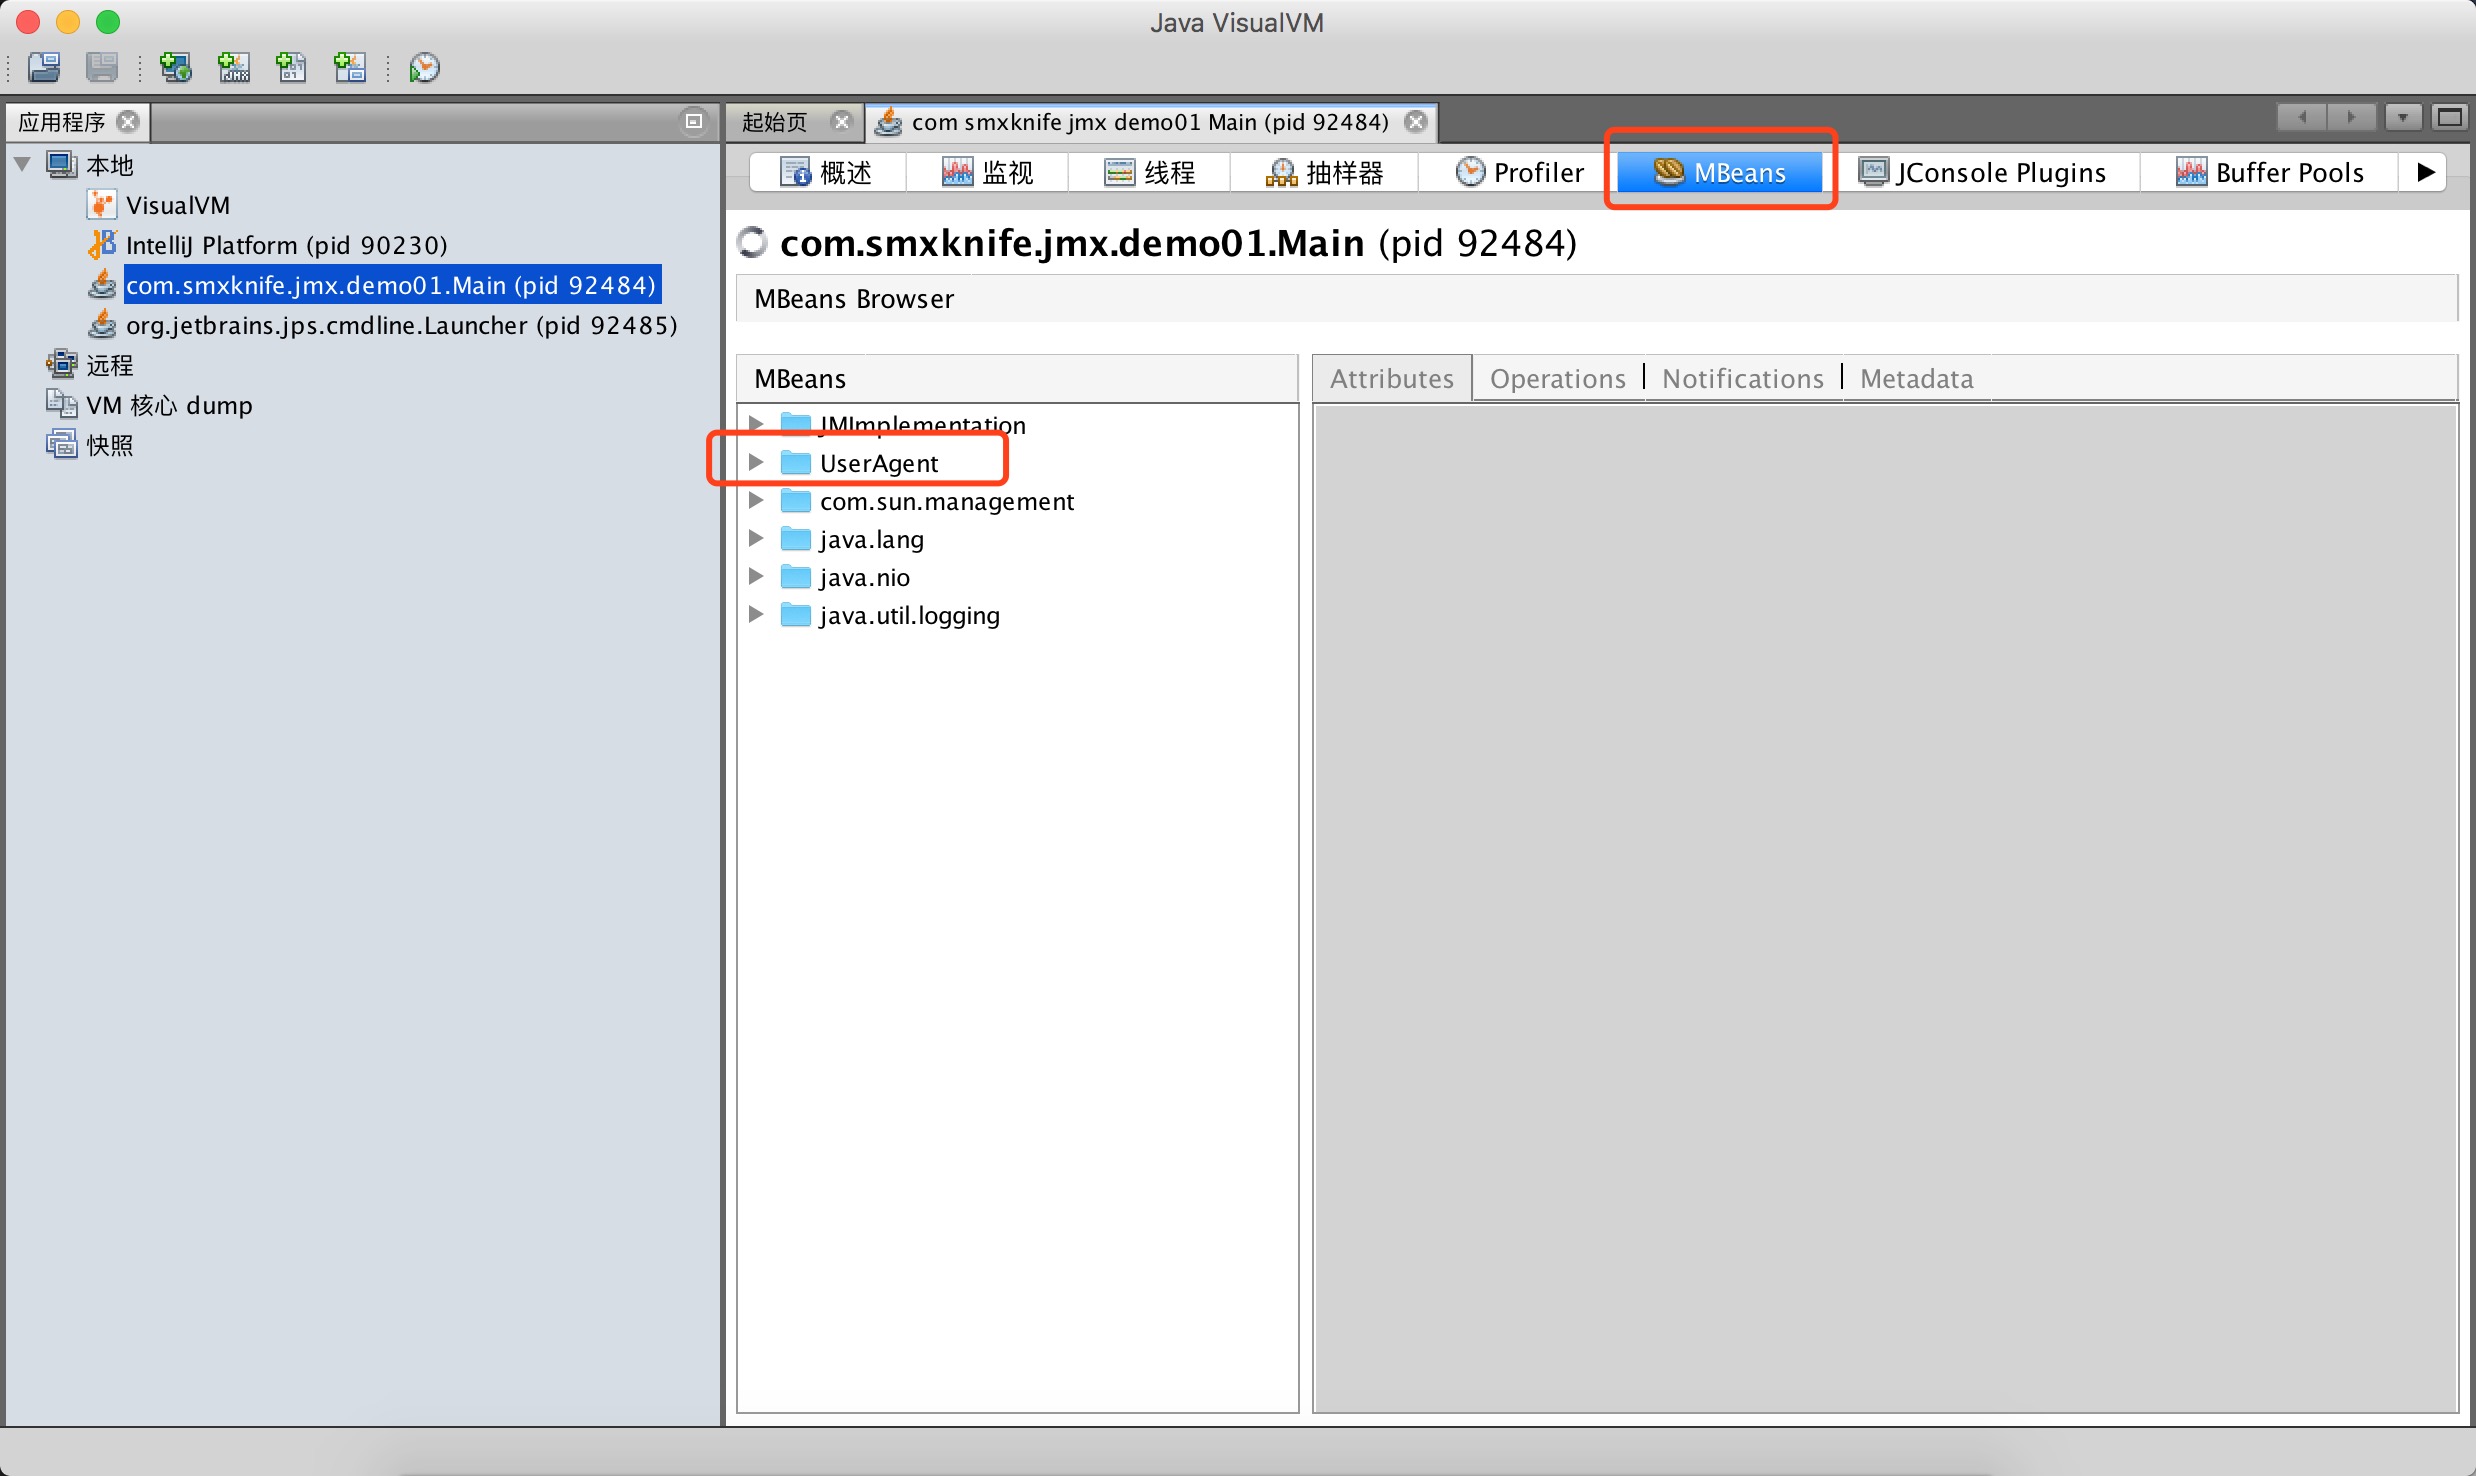
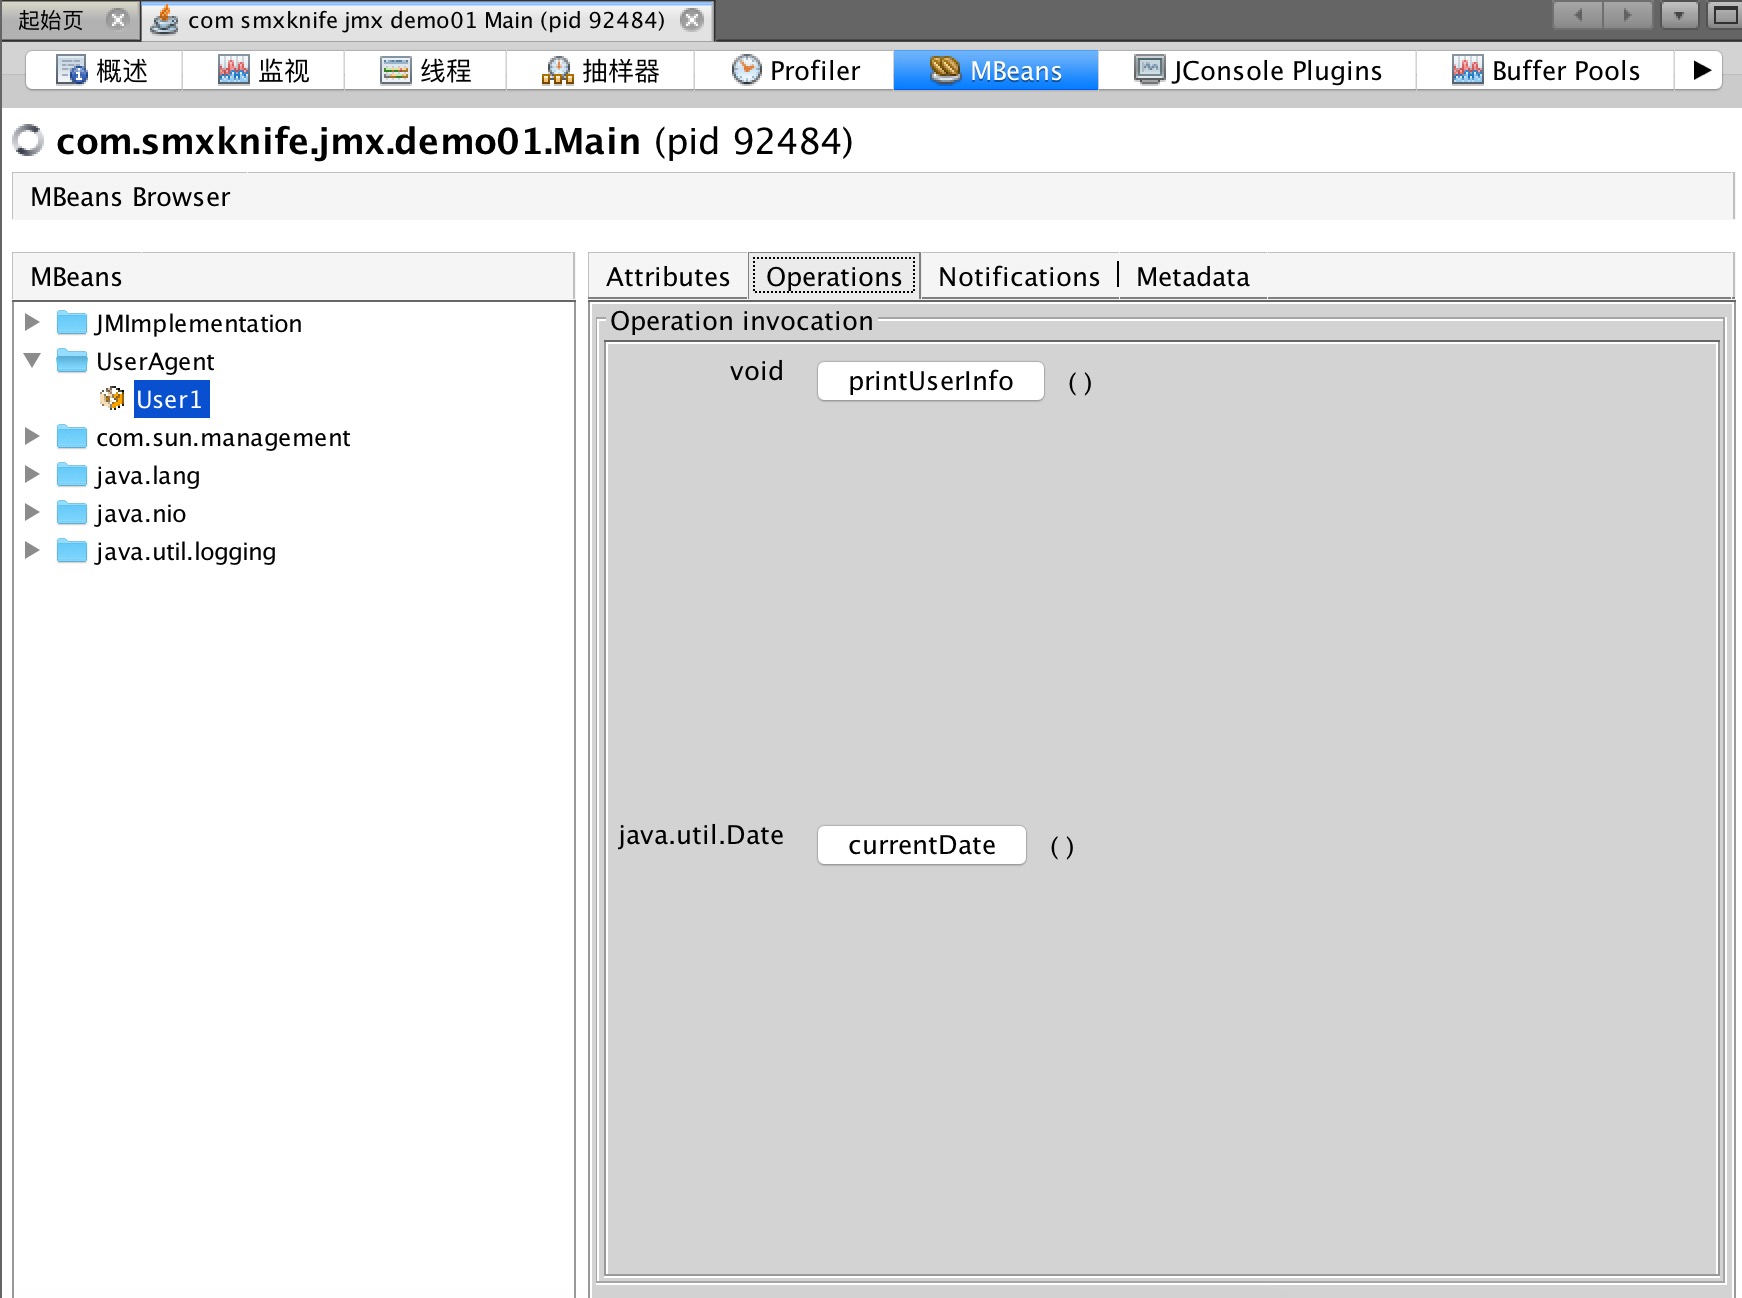
点击“MBeans”选项卡,在里面可以找到我们刚才创建的UserAgent
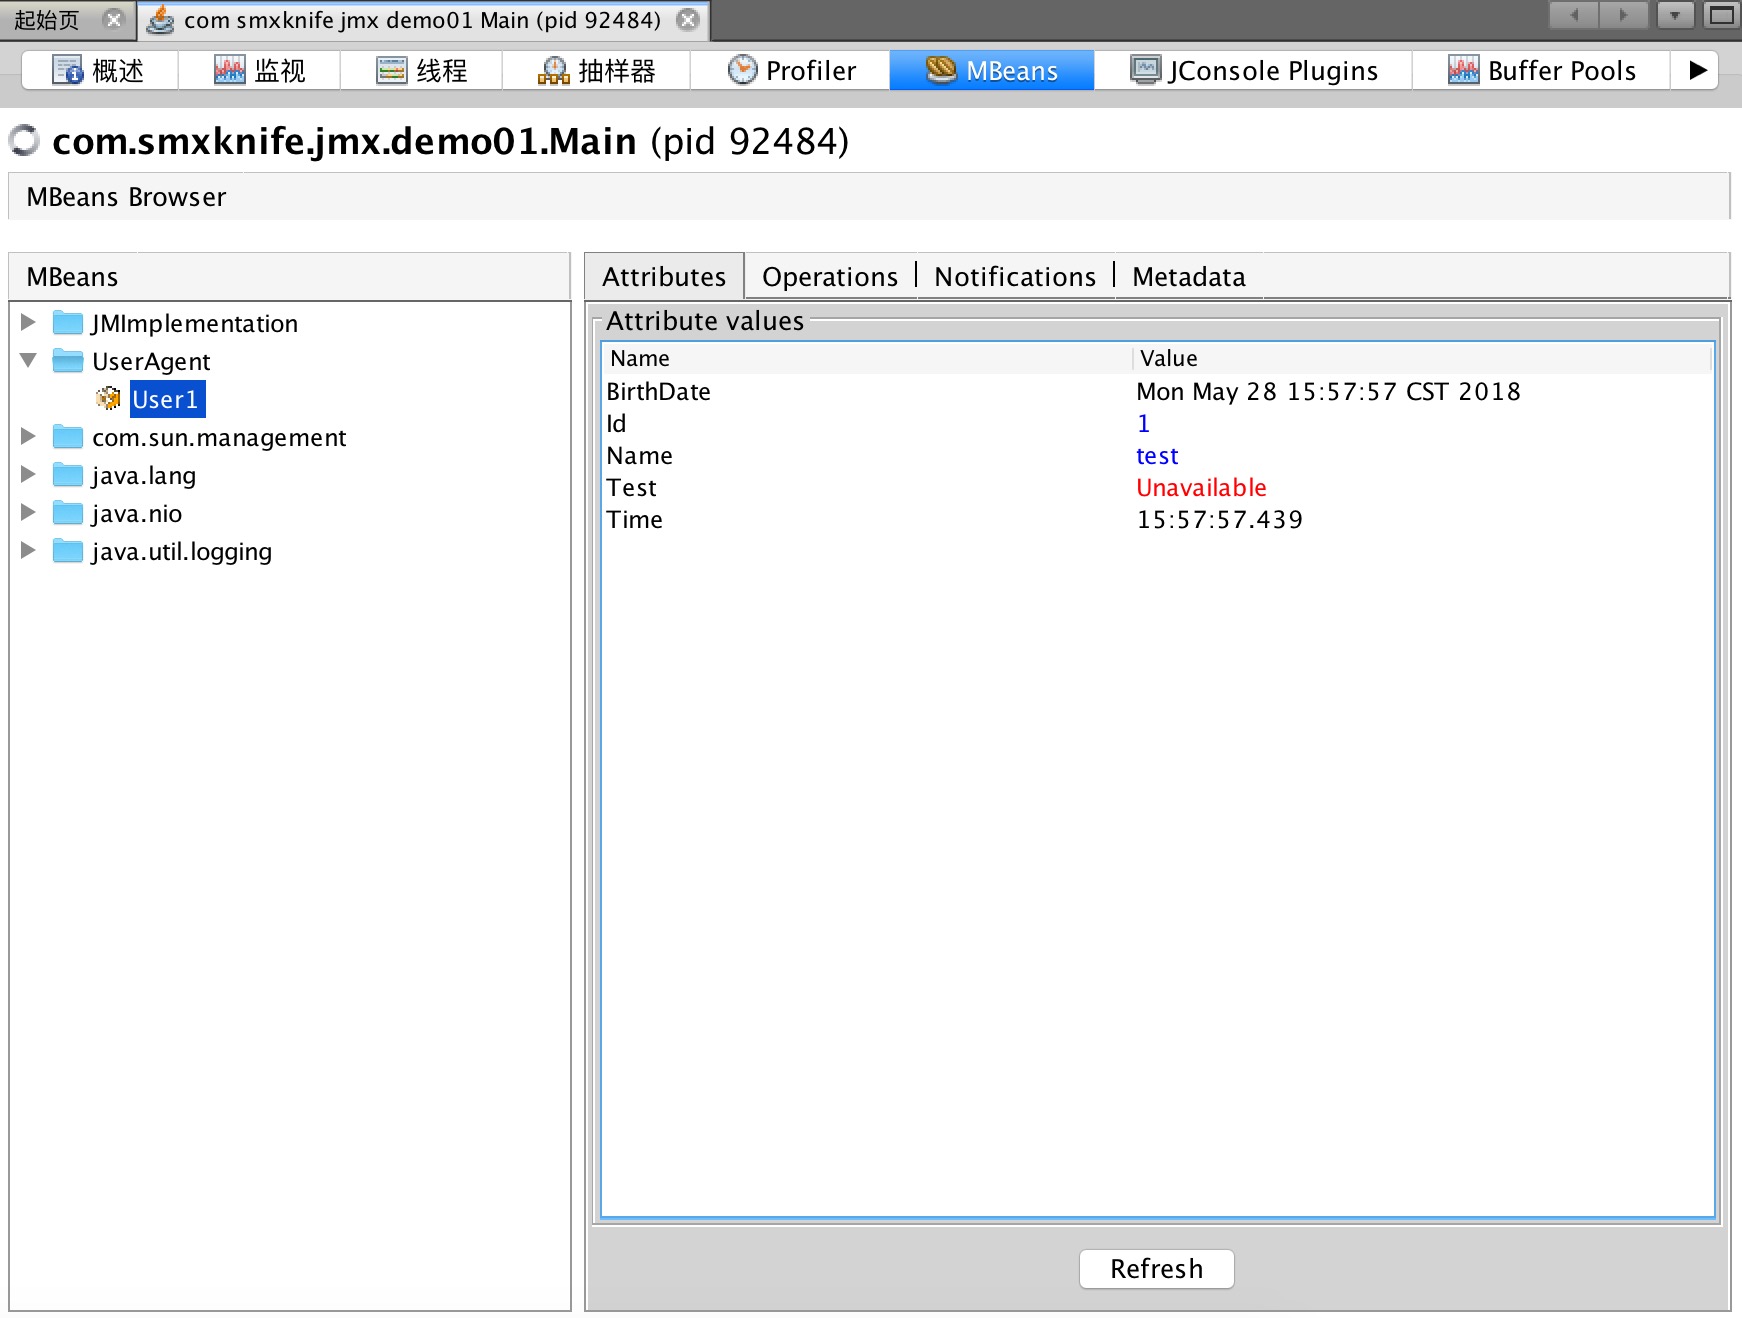
下面就让我们来具体的操作一下里面的属性值
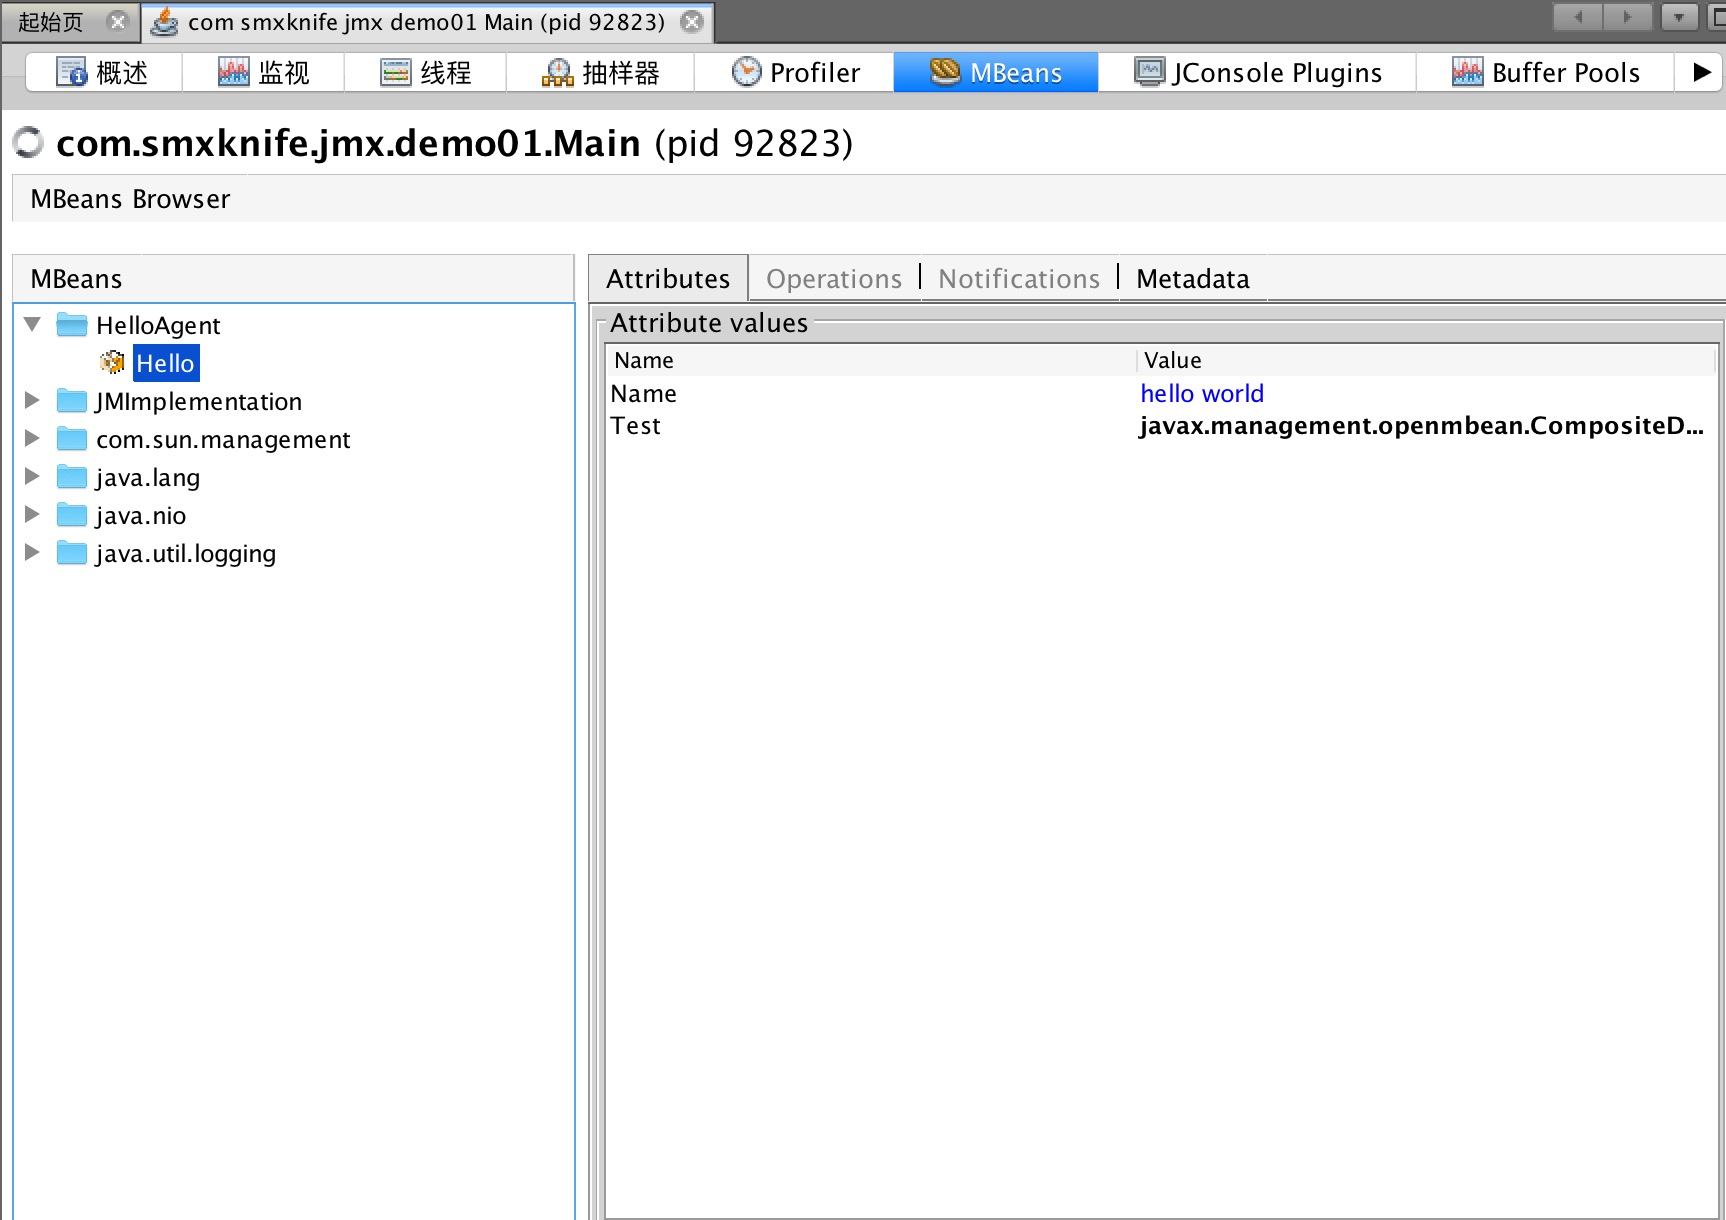
从图上可以看出,定义的属性值都显示出来了,但是Test属性的值为Unavailable,没有获取到。然后通过操作又会发现BirthDate和Time都是可以显示,但是却不可更改,其他的属性都是可显示,可修改。
注:下面的讨论是基于代码中既有set又有get
回头看代码会发现:
BirthDate和Time都是jdk提供的引用类型,但不是基础数据类型,这种数据是可显示不可修改
Test是自定义类型,这种类型直接就不显示
String虽然不是基本数据类型,却既能显示又能修改
Operations是我们定义的两个操作方法,都可以执行成功
Notifications先放在一边,后面再讲
Metadata选项卡就列举出MBean的元信息
现在是不是发现jmx的一个强悍的地方,在运行时,不通过代码在外部直接修改属性和运行方法
也许你还发现一个问题,那就是在代理中我们注入的两个MBeanServer,为什么只有一个显示?这是因为
mBeanServer = ManagementFactory.getPlatformMBeanServer();进行特殊的初始化方式,可以直接被工具识别
而mBeanServer1这种原始的初始化方式,需要我们自定义客户端来访问才可以,所以不用太纠结这个
简单Demo2 上面的Demo1是对标准MBean的一个演示,为了显示出区别,下面对MXBean进行演示
1 2 3 4 5 6 7 8 9 10 11 public interface HelloMXBean public String getName () public void setName (String name) public void setTest (Test test) public Test getTest () }
或者
1 2 3 4 5 6 7 8 9 10 11 12 @MXBean public interface Hello2 public String getName () public void setName (String name) public void setTest (Test test) public Test getTest () }
根据上面介绍,这两种方式是一样的,我试验过ok,这里就采用第一种继续做实验
定义了Test和Name两个属性,都是可读可写
1 2 3 4 5 6 7 8 9 10 11 12 13 14 15 16 17 18 19 20 21 22 23 24 25 public class HelloImpl implements HelloMXBean private String name; private Test test; @Override public String getName () return this .name; } @Override public void setName (String name) this .name = name; } @Override public void setTest (Test test) this .test = test; } @Override public Test getTest () return this .test; } }
HelloImpl通过这个名字发现,并没有遵循MBean的规范
1 2 3 4 5 6 7 8 9 10 11 12 13 14 15 16 17 18 19 20 public class HelloAgent private MBeanServer server; public HelloAgent () throws Exception server = ManagementFactory.getPlatformMBeanServer(); ObjectName name = new ObjectName("HelloAgent:type=Hello" ); Test test = new Test(); test.setName("mytest" ); test.setAge(11 ); HelloImpl hello = new HelloImpl(); hello.setTest(test); hello.setName("hello world" ); server.registerMBean(hello, name); Thread.sleep(Long.MAX_VALUE); } }
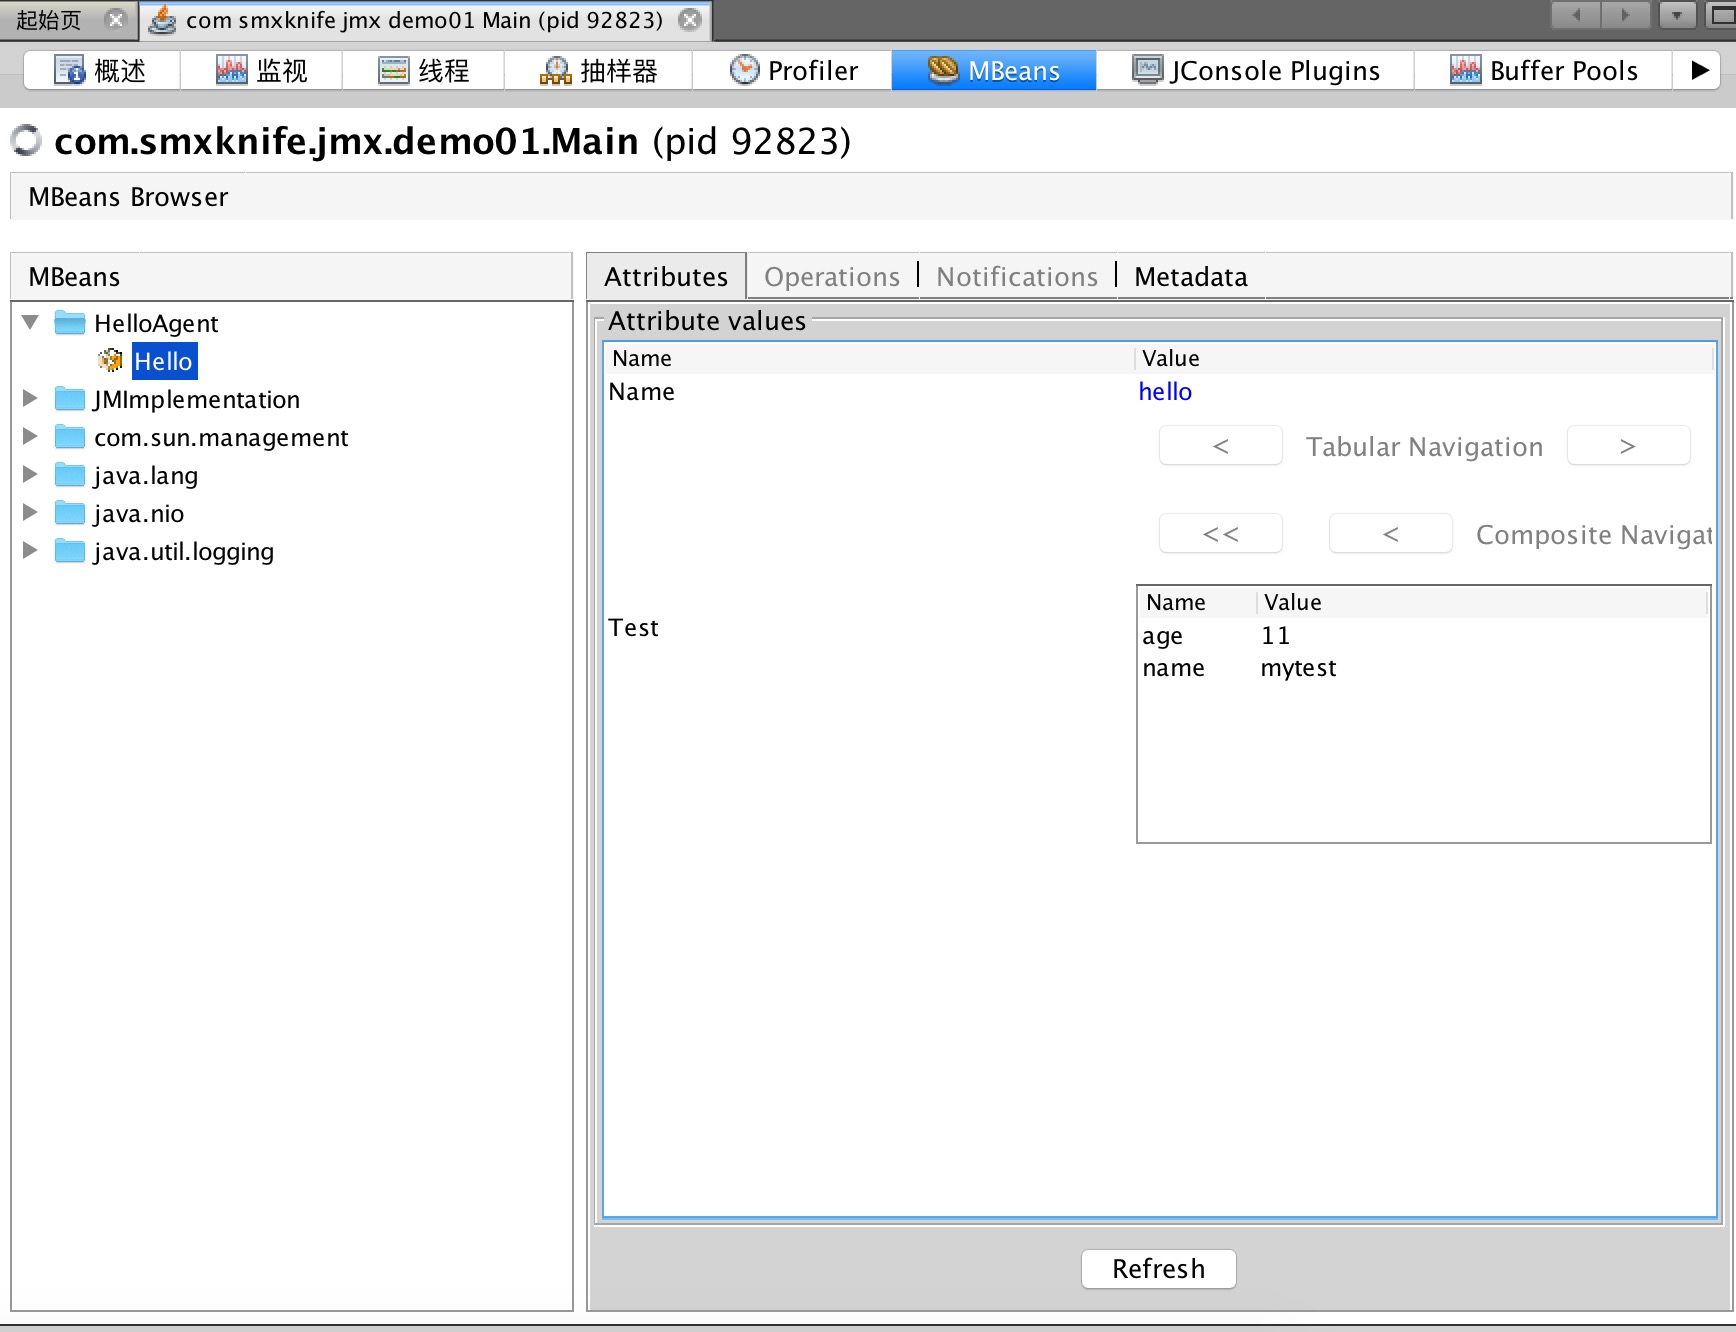
Main方法不变,就是把UserAgent换成HelloAgent即可,执行
从图中可以看出Test属性不再是Unavailable状态,而是有值,双击该值后就可以看到对象具体的数据结构,如下
通知 刚才跳过了通知的部分,现在回来说一下。
MBean是能够生成通知Notification的。如通知一个属性值改变了、监测到一个事件或者问题等等,都可以发出一个通知。通知的对象主要是远程的客户端
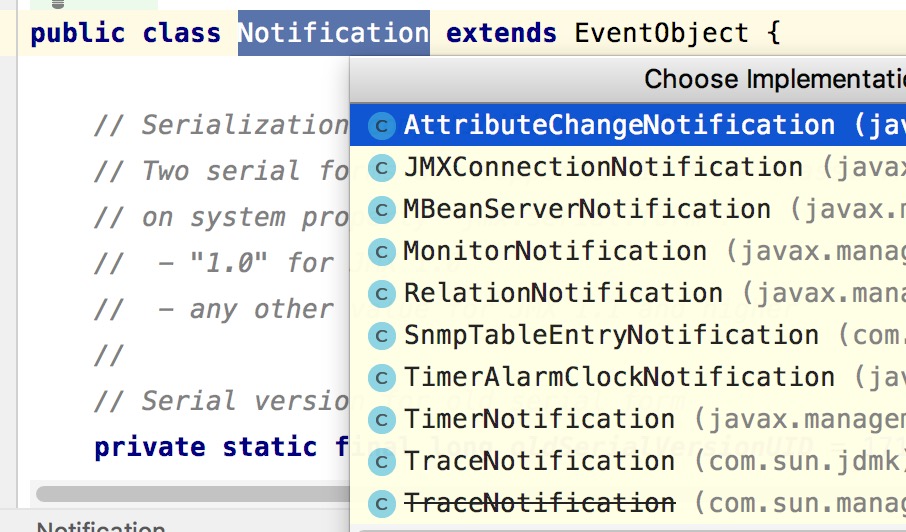
通知存在很多类型
额,这么多,不会一一说明,就以AttributeChangedNotification为例来演示一下如何使用通知功能
一个MBean想要能发送通知,首先必须继承NotificationBroadcasterSupport或者实现NotificationEmitter(这里我采用了继承NotificationBroadcasterSupport,因为他实现了NotificationEmitter)
构建一个Notification
在构建Notification时,有些事项需要注意,source就代表了当前对象
sequenceNumber,这个还是比较重要的,试想一下,如果你收到一堆通知,但是在处理的时候没有先后顺序,是不是就会乱套了。sequenceNumber就是来定义顺序的
调用sendNotification方法,这个是NotificationBroadcasterSupport里面的方法,直接调用即可
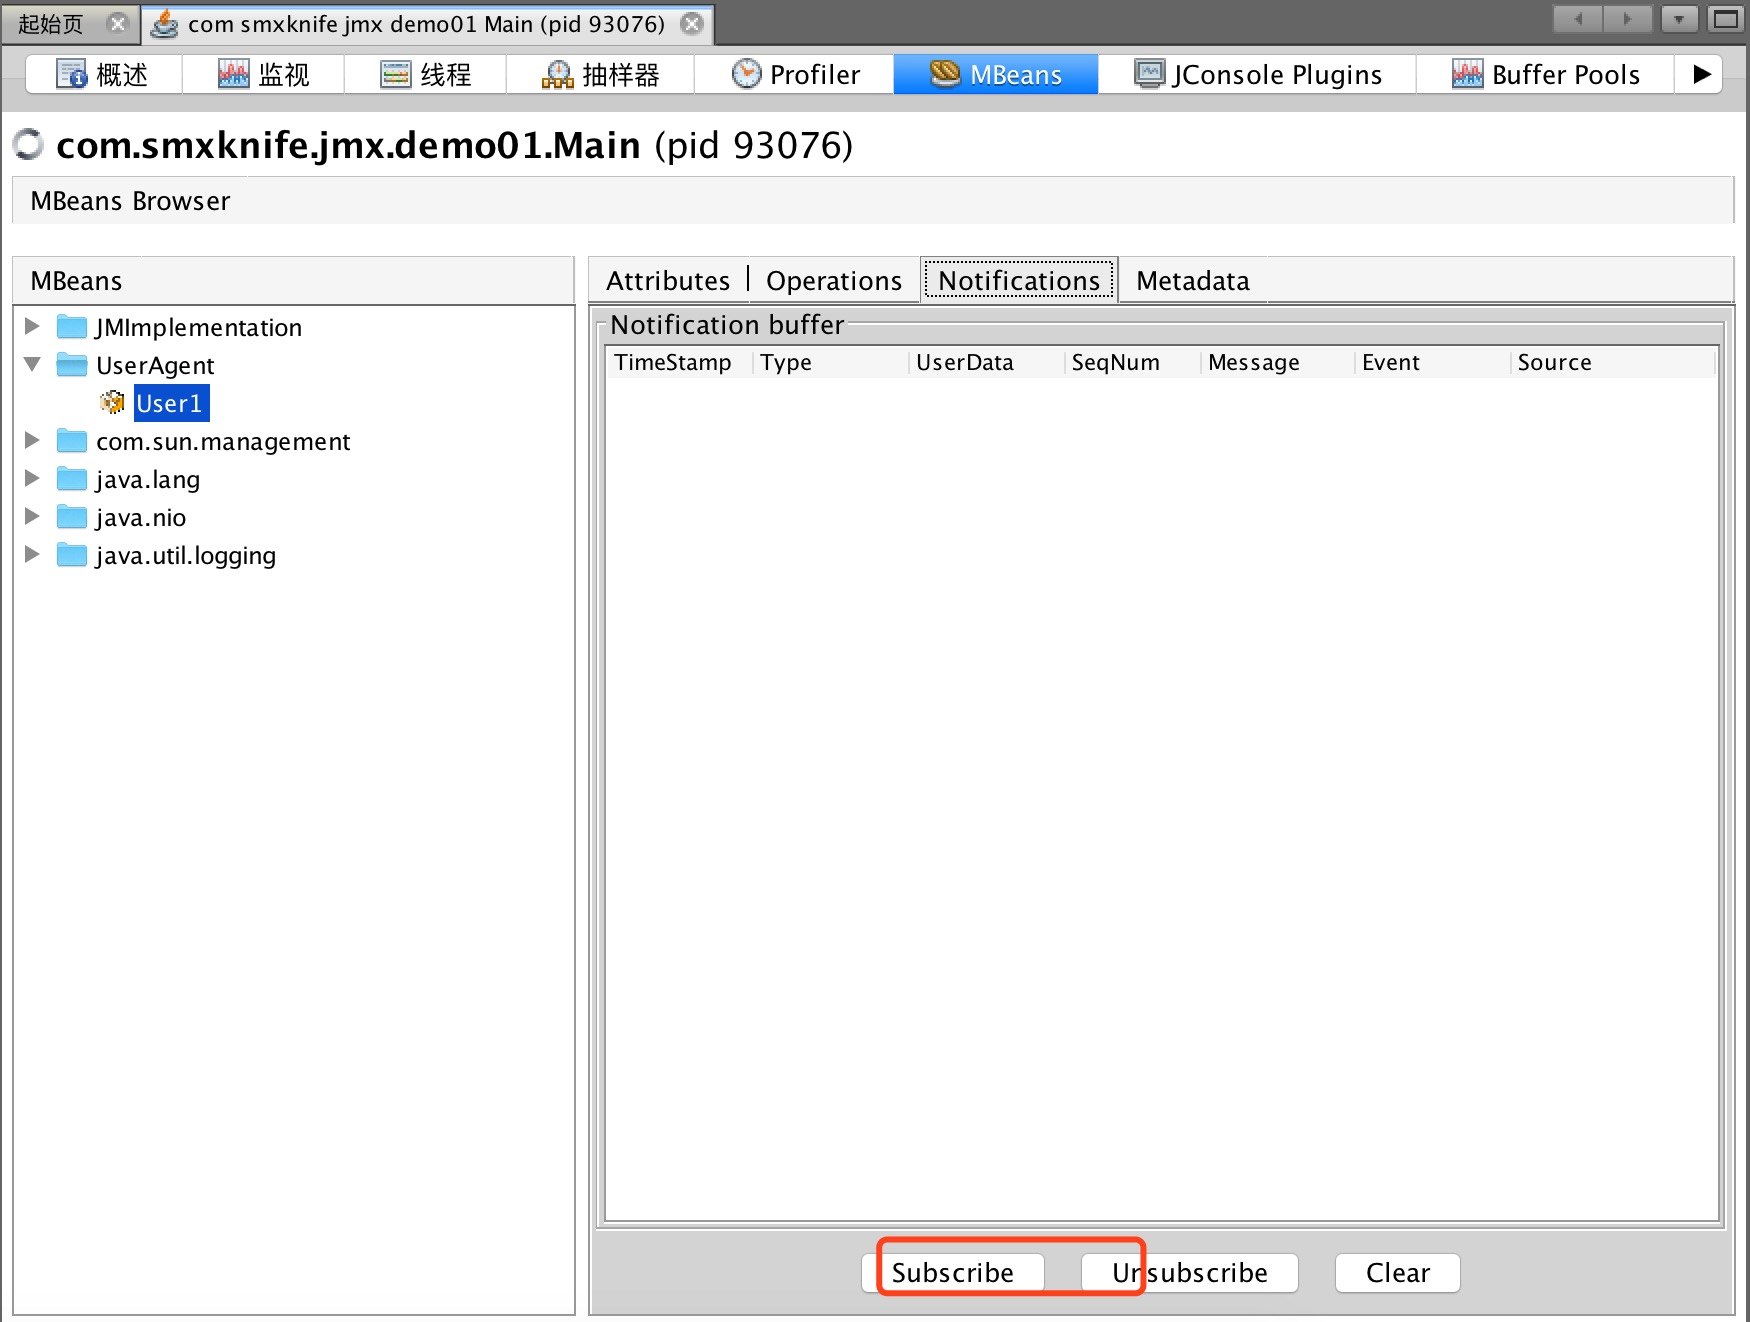
现在运行Demo1,然后修改Name的属性值,看看会有什么结果
首先需要点一下“subscribe”激活一下Notifications选项卡,注意选项卡的名字会由原来的”Notifications” => “Notifications[0]”
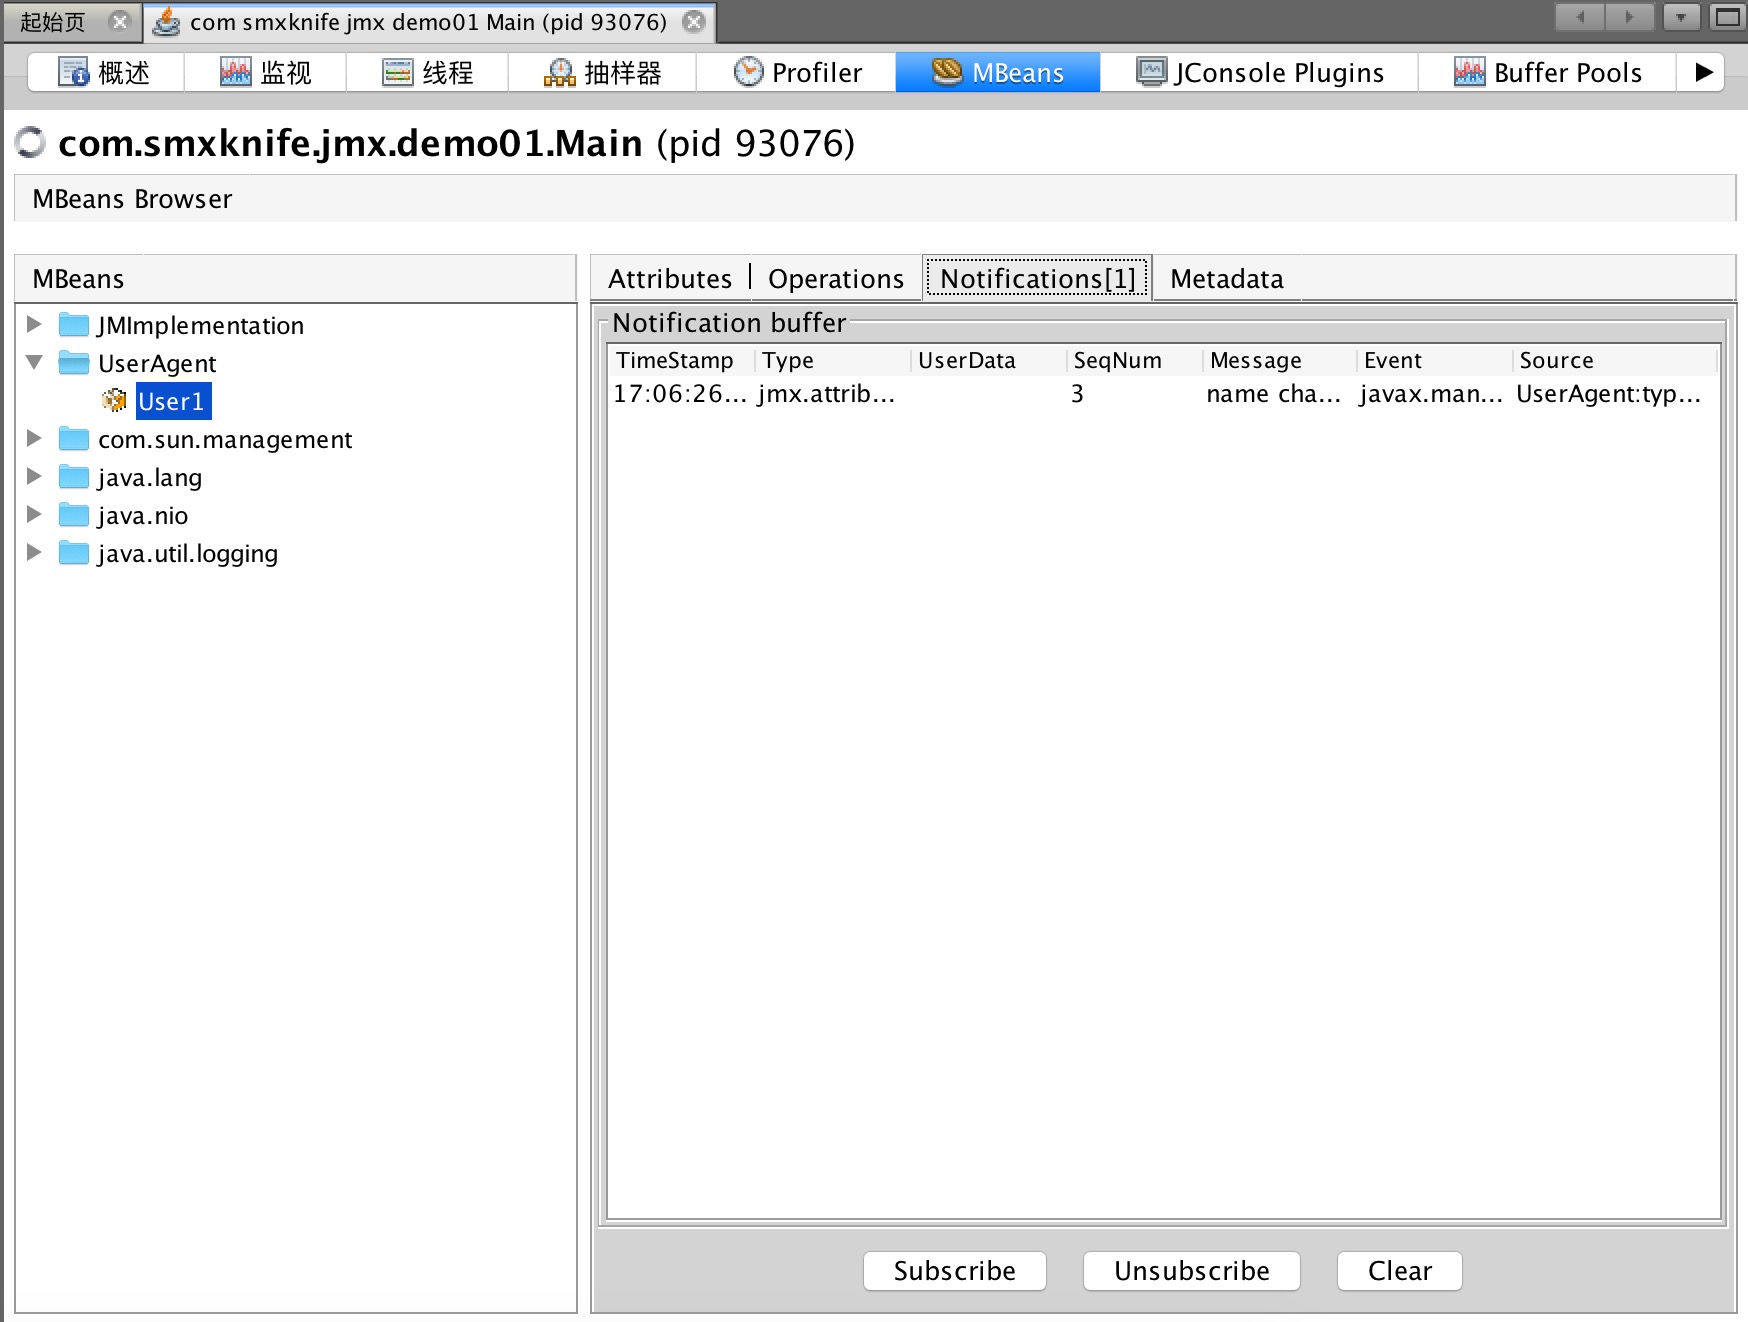
在Attributes选项卡里面修改Name的属性值,就会发现”Notifications[0]” => “Notifications[1]”
通知发送成功了
自定义JMX Client 上面的JMX所有的结果操作都是在jvisualvm上进行的。实际中我们可能需要做业务处理,那当然就需要定义我们自己的客户端处理
1 2 3 4 5 6 7 8 9 10 11 12 13 14 15 16 17 18 19 20 21 22 23 24 25 26 27 28 29 30 31 32 33 34 35 36 37 38 39 40 41 42 43 44 45 46 47 48 49 50 51 52 53 54 55 56 57 58 59 60 61 62 63 64 65 66 67 68 69 70 71 72 73 74 75 76 77 78 79 80 81 82 83 84 85 86 87 88 89 90 public class ClientBoot public static void main (String[] args) try { UserAgent userAgent = new UserAgent(); JMXServiceURL url = new JMXServiceURL("service:jmx:rmi:///jndi/rmi://localhost:9999/jmxrmi" ); JMXConnector jmxc = JMXConnectorFactory.connect(url, null ); MBeanServerConnection mBeanServerConnection = jmxc.getMBeanServerConnection(); String[] domains = mBeanServerConnection.getDomains(); System.out.println(domains); for (int i = 0 ; i < domains.length; i++) { System.out.println("domain[" + i + "]=" + domains[i] ); } Set<ObjectName> objectNames = mBeanServerConnection.queryNames(null , null ); for (ObjectName objName : objectNames) { System.out.println("=========== " + objName + " ============" ); MBeanInfo mBeanInfo = mBeanServerConnection.getMBeanInfo(objName); System.out.println("[Attributes]" ); for (MBeanAttributeInfo attr : mBeanInfo.getAttributes()) { Object value = null ; try { value = attr.isReadable() ? mBeanServerConnection.getAttribute(objName, attr.getName()) : "" ; } catch (Exception e) { value = e.getMessage(); } System.out.println(attr.getName() + ":" + value); } System.out.println("[Operations]" ); for (MBeanOperationInfo oper : mBeanInfo.getOperations()) { System.out.println(oper.getName() + ":" + oper.getDescription()); } System.out.println("[Notifications]" ); for (MBeanNotificationInfo notice : mBeanInfo.getNotifications()) { System.out.println(notice.getName() + ":" + notice.getDescription()); } } ObjectName name = new ObjectName("UserAgent:type=User" ); ClientListener listener = new ClientListener(); mBeanServerConnection.addNotificationListener(name, listener, null , null ); mBeanServerConnection.setAttribute(name, new Attribute("Id" ,1234567 )); mBeanServerConnection.setAttribute(name, new Attribute("Name" , "finish" )); Object userId = mBeanServerConnection.getAttribute(name, "Id" ); Object userName = mBeanServerConnection.getAttribute(name, "Name" ); System.out.printf("userId=%s, userName=%s" , userId, userName); UserMBean userMBean = MBeanServerInvocationHandler.newProxyInstance(mBeanServerConnection, name, UserMBean.class, false ); userMBean.setPassword("pppppppp" ); userMBean.printUserInfo(); mBeanServerConnection.invoke(name, "printUserInfo" , null , null ); } catch (Exception e) { e.printStackTrace(); } } public static class ClientListener implements NotificationListener public void handleNotification (Notification notification, Object handback) echo("\nReceived notification:" ); echo("\tClassName: " + notification.getClass().getName()); echo("\tSource: " + notification.getSource()); echo("\tType: " + notification.getType()); echo("\tMessage: " + notification.getMessage()); if (notification instanceof AttributeChangeNotification) { AttributeChangeNotification acn = (AttributeChangeNotification) notification; echo("\tAttributeName: " + acn.getAttributeName()); echo("\tAttributeType: " + acn.getAttributeType()); echo("\tNewValue: " + acn.getNewValue()); echo("\tOldValue: " + acn.getOldValue()); } } private void echo (String s) System.out.println(s); } } }